The software release process is a critical aspect of any software development project. A manual software release process can be time-consuming, error-prone, and often leaves room for human error. This is where an automated release process comes in. The tools mentioned in this article (used in TypeScript/Javascript projects) can help streamline and optimize the software release process, making it more efficient and less prone to errors, by reducing human involvement.
The importance of the items and the order in which they are presented in this article, is that each of them is part of the final result which we wish to achieve. In the end you’ll see they all match together to make the development and release process work.
Notes
- When I mention the “master/main” branch, it can be either master or main, depending on what you agreed with your team.
- When I mention Github Actions it can also be done in any other CI/CD service or software
In this article
- Versioning
- A convention to use in all commits
- Making sure that the Conventional Commit rules are followed
- Local Git hooks
- Way of working
- Creating a Release
- Automatic Changelog generation
- Further improvements
- Conclusion
Versioning
When thinking about a software release, it all starts with deciding how the versioning will be handled. I’ve been following Semantic Versioning (semver) in my projects for years now and recommend it.
This means that:
Given a version number MAJOR.MINOR.PATCH, increment the:
- MAJOR version when you make incompatible API changes
- MINOR version when you add functionality in a backwards compatible manner
- PATCH version when you make backwards compatible bug fixes Additional labels for pre-release and build metadata are available as extensions to the MAJOR.MINOR.PATCH format.
Ps: There’s also a variation of it for purely frontend repositories.
A convention to use in all commits
In most projects, if the team wants to keep some kind of changelog, it’s necessary to write the latest changes somewhere manually (Confluence, Notion, a CHANGELOG.md file, Slack, etc). We want to automate that and remove the manual steps required in order to create a release, but we’ll get to this part on how to automate the changelog generation in a bit. There’s one step which is a requirement for us to get there:
The Conventional Commits specification provides a group of rules on how to format every commit message so that they all follow the same pattern across the project. It is used by the Angular team and many other big projects.
Example of a commit message: <type>[optional scope]: <description>
A commit contains the following structural elements, to communicate intent:
- fix: a commit of the type fix patches a bug in your codebase (this correlates with PATCH in Semantic Versioning).
- feat: a commit of the type feat introduces a new feature to the codebase (this correlates with MINOR in Semantic Versioning).
- BREAKING CHANGE: a commit that has a footer
BREAKING CHANGE:, or appends a!after the type/scope, introduces a breaking API change (correlating with MAJOR in Semantic Versioning). A BREAKING CHANGE can be part of commits of any type. - types other than
fix:andfeat:are allowed, for example @commitlint/config-conventional (based on the Angular convention) recommendsbuild:,chore:,ci:,docs:,style:,refactor:,perf:,test:, and others. - footers other than
BREAKING CHANGE: <description>may be provided and follow a convention similar to git trailer format.
Additional types are not mandated by the Conventional Commits specification, and have no implicit effect in Semantic Versioning (unless they include a BREAKING CHANGE). A scope may be provided to a commit’s type, to provide additional contextual information and is contained within parenthesis, e.g.,
feat(parser): add ability to parse arrays.
Making sure that the Conventional Commit rules are followed
In order to enforce that the correct format is followed, the commitlint library can be automatically called via git hooks locally when the developer tries to create a new commit. It works as a linter, but for commit messages!
Install the following packages:
Then add a file called commitlint.config.js to the root of your project, with the following content:
module.exports = { extends: ['@commitlint/config-conventional'] };
Local Git hooks
Git hooks are scripts that run automatically before or after executing Git commands like Commit and Push. With Git hook scripts, users can customize Git’s internal behavior by automating specific actions at the level of programs and deployment, like for example validating that the commit is following the standards and not breaking the tests.
They can be managed with the use of a library called husky.
The hooks I usually configure are: pre-commit, commit-msg and pre-push
- pre-commit: When the developer tries to commit what was implemented, the pre-commit hook will be automatically called and run eslint with the predefined rules. If the code is invalidated by these rules, the commit doesn’t happen until the issues are fixed. It’s better to have the linter at commit time to allow for smaller and timely iterations instead of only checking these during the push to the repository
- commit-msg: When the developer writes the commit message, it is automatically checked against commitlint, which validates the commit message against the Conventional Commits specification. If the commit message is not valid, the commit doesn’t happen until the message is fixed.
- pre-push: When the developer tries to push the commit(s) to the repository, the pre-push hook is called automatically and runs “npm test”. The push to the repository only happens if all tests are passing.
Configuring husky
Install the husky library as a dev dependency:
npm i husky --save-dev
Run the following to add the following to the package.json file:
npm pkg set scripts.prepare="husky install"
npm run prepare
Add the pre-commit hook that runs the linter:
npx husky add .husky/pre-commit "npm run lint"
Ps: My eslintrc example can be found here.
Add the commit-msg hook that runs commitlint:
npx husky add .husky/commit-msg "npx commitlint --edit $1"
Then finally the pre-push hook that runs the tests:
npx husky add .husky/pre-push "npm test"
After these steps, commit the .husky directory to the git repository.
Way of working
For the automated changelog generation to work well, it’s important to have a well defined development process.
When a developer starts to work on a ticket, a new branch needs to be created in the git repository. This branch must be created out of the develop branch.
Branch naming conventions
The name of this new branch that the developer will create can be anything. It doesn’t really matter in this case, as it must be automatically deleted after the PR is merged so that the repository doens’t become a mess of hundreds or thousands of branches. What I recommend, though, is to follow a similar format to what is done in the commits, so that it’s easy to identify what that branch is about.
For example, if it’s a new feature:
feat/name-of-the-feature
if it’s a fix:
fix/name-of-the-fix
Pull Request title
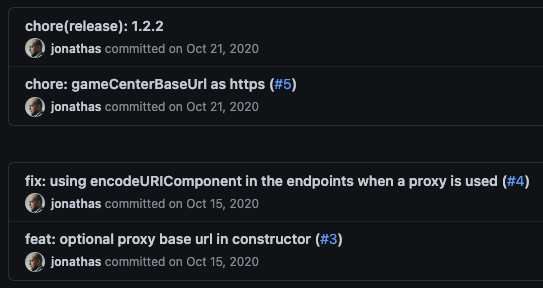
When the developer is ready to submit changes to the repository, a new Pull Request needs to be created. The Pull Request title matters more than the name of the branch, since that’s what will end up in our git history and, consequently in our automatically generated changelog! Hence, when creating a Pull Request, its name must follow the Conventional Commits specification.
An example of how the PRs following Conventional Commits would look like in the repository history:
If you’d like to also link the PRs to Jira tickets, it’s recommended to add the Jira ticket to the PR title as well, following this format:
<type>(scope): description [jiraticket-number]
For example:
fix(calendar): default pagination limit [AG-1103]
AG-1103 in this case being the Jira ticket.
Ps: You’ll need to, of course, configure this sync between Github and Jira separately. This part is not covered by this article.
Making sure the Pull Request title format is followed
Using Github Actions, it’s easy to implement a workflow that checks the Pull Request title and validates it against the Conventional Commits specification.
You can find the gist with the code here.
Save this code to the following path in your project: .github/workflows/lint-pr-title.yml
Whenever a PR is created, this workflow runs and doesn’t allow the PR to be merged if the title is incorrect.
Imagine dependabot creates 20 PRs and all of them run your Github Actions workflows. That would spend a lot of precious Github Actions minutes, which cost money! So as a bonus, this workflow doesn’t run on PRs created automatically by dependabot, which should already be following the Conventional Commits specification.
Pull Request content
A good pull request should allow developers to review it quickly, so it needs to be small and well explained. The best way of thinking about it to keep it smaller is that it should cover one thing only, as in the Single Responsibility Principle (SRP).
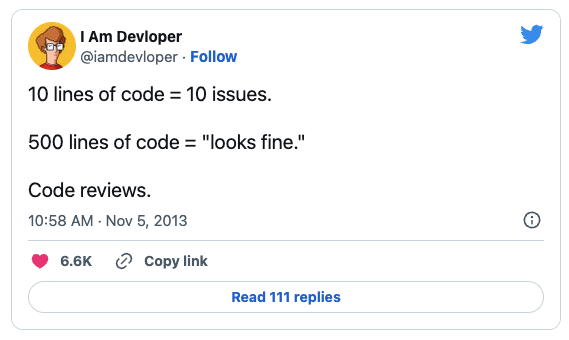
Here’s an interesting and worth reading article I found the other day that gets deeper into this topic: The anatomy of a perfect pull request
Merging strategy
In order for the changelog generation process to work correctly, the git history needs to be clean, so there must be no merge commits in the develop nor in the master/main branches. The repository needs to be configured to only allow squash merging, so that only PRs end up in the git history. In Github that can be done in the following area:
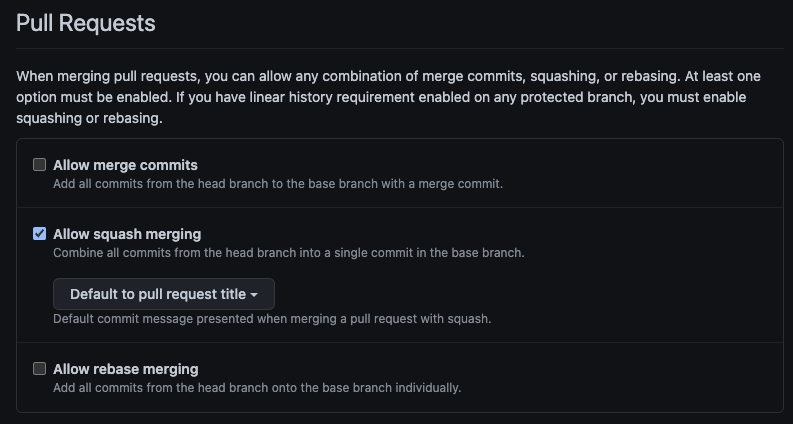
And then the developers can configure git locally to always use rebase so that they won’t need to create merge commits when fixing conflicts in PRs. This can be done globally for all projects by running the following command:
git config --global pull.rebase true
Then when synching the changes from the develop branch to the branch they’re working on, they can just pull the latest changes from develop into their branch and the rebase will happen automatically:
git checkout feat/my-feature-branch
git pull origin develop
Status checks on Pull Requests
As with the Github Action workflow to validate the PR title, it’s recommended to run other status checks on PRs to validate that the PR can only be merged to the develop branch if all the status checks are passing. These are recommended to be added to the repository:
- Run integration tests
- Run unit tests
- SonarCloud Code Analysis
Bear in mind that if you have dependabot enabled in your repository, it’s usually a good idea to change the validations above so that they don’t run on PRs created by dependabot. Otherwise you’ll see a big increase in Github Actions minutes. I won’t go deeper in details about them as it’s not the focus of this article.
Deployment to Staging
From “What is a Staging Environment?”
A staging environment or staging site is a copy of your live website and is the last step in the deployment process before changes are deployed to your live website. By having a staging environment that is a copy of your live environment you are able to test new changes made by your developers before they are released to your live website. Using multiple environments is not necessary, but it comes with a long list of advantages, which are especially important if you work on big or complex projects. Testing new changes on a staging environment before deploying them to your live website also reduces the risk of any errors or issues that will affect your users. This effectively means happier users and more uptime for your website.
The deployment to Staging should happen every time a PR or commit is merged to the develop branch. This can be done by configuring Github Actions, for example, to start and handle the deployment once that happens.
Deployment to Production
If there’s no well defined process yet for deployments to production, it’s always good to follow the golden rule of “no deployments on Fridays!”
Whenever we want to deploy to production, a release needs to be created.
A release branch can be created out of the develop branch, then a PR can be created so that after it’s approved it’s merged to the master/main branch.
Then after that, the release process can be started manually with the help of the release-it wizard or the Github Action can pick it up, run the release-it lib inside of it in automated mode and do what else needs to be done for deployment. We’ll talk more about this part below, so keep reading.
The release process should always be started on the master/main branch and then synched back to develop.
Rolling back
In case the release breaks production even after all the status checks and QA approval, we need to have a way to rollback what is deployed to production to a stable version. This can be done via a Github action workflow, which exists for this purpose and can be started manually.
From the repository, the developer should be able to select which branch this workflow should run from, so that this branch with the fix replaces what is in production. Or this workflow can instead always revert the master/main branch to the previous version. It’s a good idea to decide with your team how this process will be handled in your specific case.
Creating a Release
Finally after all is configured in the repository and the team is following a well defined development process, it’s time to talk about creating the release!
This process is handled by the release-it library, which can be used in two ways:
- Manually: One of the developers runs
npm run releaselocally, which starts the release-it wizard, which in turn takes care of what’s needed. - Automatically via CI/CD: After the PR is merged, the Github Action with the release-it library starts from there and takes care of what’s needed.
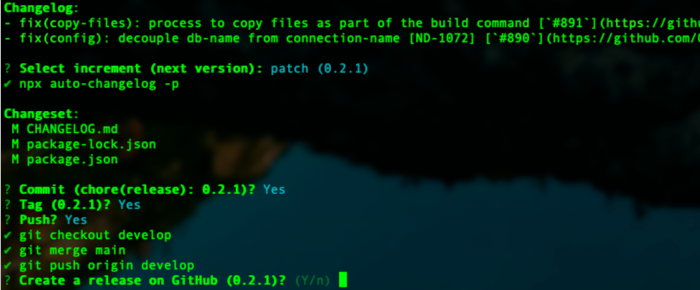
When the release-it library starts, it:
- Identifies which commits happened after the last version
- Bumps the version in package.json following the Semver convention
- Adds the changelog related to the new version to the CHANGELOG.md file (using the auto-changelog library)
- Creates a commit with the new version. For example:
chore(release): 0.3.1 - Creates a Git tag with the version
- Pushes these changes to the master/main branch of the repository
- Creates a Github release
- Merges the master/main branch back to develop and pushes develop, to keep the branches in sync
Configuring release-it
Install the release-it library:
npm i release-it --save-dev
Add the following to the “scripts” part of the package.json file to enable the npm run release command:
"release": "release-it",
Create a .release-it.json file on the root of your project:
{
  "hooks": {
    "before:init": ["npm test"],
    "after:bump": ["npx auto-changelog -p"],
    "after:git:release": ["git checkout develop", "git merge master", "git push origin develop"]
  },
  "git": {
    "requireBranch": "master",
    "commit": true,
    "commitMessage": "chore(release): ${version}",
    "commitArgs": "",
    "tag": true,
    "tagName": "${version}",
    "tagAnnotation": "${version}",
    "push": true,
    "requireCommits": true,
    "changelog": "npx auto-changelog --stdout --commit-limit false -u --template https://raw.githubusercontent.com/release-it/release-it/master/templates/changelog-compact.hbs"
  },
  "github": {
    "release": true,
    "releaseName": "${version}",
    "tokenRef": "GITHUB_TOKEN"
  },
  "npm": {
    "publish": false
  }
}
Ps: If your project is an npm library, you can also make release-it push it to npmjs.com automatically by changing npm.publish to true in the config above.
Automatic Changelog generation
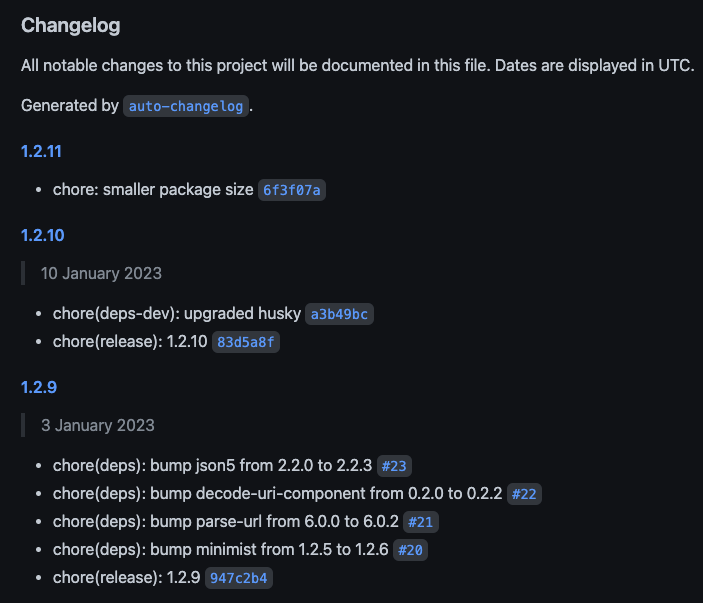
With the use of the release-it library, the changelog is generated automatically during the release process. Every item in git history from the last version until now is added to the beginning of the CHANGELOG.md file in the root of the project. It’s important that the previous steps mentioned in this article are followed so that the resulting changelog is well formatted.
The automatically generated changelog looks like the following:
As the changelog file is in Markdown format, it also contains links to the specific PRs.
Configuring auto-changelog
Install the auto-changelog library:
npm i auto-changelog --save-dev
And that’s it, as the integration is already configured with release-it.
Further improvements
As an idea for further improvement, in case your company has a Slack channel where people need to post changelogs to, you can extend the idea presented in this article to post the automatically generated changelog to Slack.
The release-it library allows us to add a post release hook that could be integrated with that or it can be done via a job in the same Github Actions workflow.
Conclusion
By using the tools and processes presented in this article, development teams can improve the software release process and deliver high-quality software faster with efficiency, better accuracy and quality. Do you have any idea for improvement or have you been working differently? Let me know in the comments and let’s discuss so I can learn more from your experience as well!


